Tuesday, June 30, 2009

J. Sterns Tee #0041

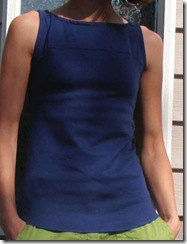
Here's the J. Stern's Tee I made yesterday. It's a basic t-shirt with extra seaming details at the bust. It also has a long, curves hem at the bottom. It's about 10am here and the light isn't all that great. I mean, it's light but it's kind of blotchy because it is through the big birch trees in our yard.

I made this out of the remaining doubleknit I used on this BWOF pleated bodice dress. It's a pretty thick fabric and it wasn't a great match. It has the right amount of stretch according to the pattern envelope but it is just so thick. It's a bit tight as you can see in the photos. I made a small which is what I supposed to make according to the envelope. I may trace off the medium too. I did my typical petite 1/2" shortening between shoulders and bust. I don't think that I needed to. I think the bust seaming would look better down a 1/2" and the armhole is too tight. On a BWOF pattern, I make the armhole a bit smaller too and it's perfect. This is too snug.
js_0041_1

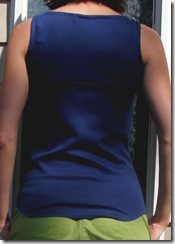
Here are the swayback wrinkles. I always get these. I could put a CB seam in it but . . . well, it's just a t-shirt. You can tell it's a bit too small in the hips. I should have flared out a little bit.
js_0041_2


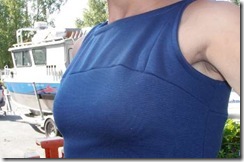
See? Don't you think the seam would be better down a 1/2"? And I found that the bottom front was longer than the bodice. I stretched it to fit but that created some gathering in the top piece.
js_0041_3


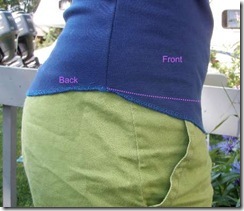
This is something that I will change if I make this again. See how long it is in the front? I'm not sure if it is supposed to be longer in the front than the back but it is. I will shorten it on the pink dotted line. Probably my swayback wrinkles are making the back a bit higher so the front looks longer. But, when I sit down, the front folds up because of my legs so it's too long anyway.
js_0041_5


The bodice side seams.
js_0041_4


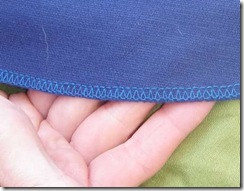
I serged the bottom hem.
js_0041_6


Another view of the bodice with those wrinkles. See the boat in the background? That's our ocean boat. We are headed to Homer for a week of halibut fishing.js_0041_7


I'll post a review later on PatternReview.com.

More on the knockoff

Yesterday I decided I would knockoff this HP dress. It's the Metropolitan Good Times Top, Tunic, and Dress. Here's the line drawing from HotPatterns.


Check out this Simplicity pattern. It's got the yoke, the gathers, and everything. This is one of the few Simplicity patterns I was going to buy a few weeks ago. But, of course, they didn't have it in my size. Now, I'll have to track it down. It's purty darn close. We'll see what I decide to do.


I still have a ton of hand stitching to do on my couture jacket before tomorrow so I'll be scarce today. Although I do want to review the J. Sterns top I made yesterday.

And I know a bunch of you asked what Hot Patterns emailed to me. I don't want to trash them. Suffice it to say it wasn't all that nice and I'll probably never buy a Hot Patterns pattern.

Monday, June 29, 2009

Before 8am . . .

I'll post later about my couture jacket class. I have quite a few things to explain for that. It seems like we spent six weeks fitting the jacket and now we are hot and heavy to try to finish it. Of course, it hasn't been that long but it seems like it to me. Anyway, thought I take you on a tour of what I've done today before 8am. People always wonder how I can get so much done. This is how:

--Four mile run (5:30am)

--Cut out and sewed the sleeveless J. Sterns top. You'll get a picture when my camera comes back from Whittier. The Husband-Unit took it because it is water proof.

--Contemplating my next knit dress. I want to be able to wear it with the red leather obi. Is this too nautical or too Fourth of July? I think one of the May BWOF knit dresses but I haven't decided which one.


--I've always really liked this HotPatterns patten. I love the dress version. I've decided to knock it off. HotPatterns won't like it (they sent me a nasty email last time for this dress; God forbid, I show YOU how to knock it off; stealing customers!; losing revenue! chaos!) but I know that BWOF fits me and why buy an expensive pattern that has lukewarm reviews? The line drawing is small but you can see the general idea of the dress.


I'm going to use this BWOF pattern to knock it off. It's from July 2008. I've never made it but with a few modifications, it should be fine. I'll raised the neck, change the location of the pleats, lengthen, add a belt, and change the sleeves.


And yes, that's really only two things (run and J.Sterns top) but I think the planning phase is just as important as the sewing phase. If I can get this all worked out in my head, the sewing will be easy. I think that is one reason I rarely make mistakes while I sew. I've mentally sewn it five times before I get to the machine. While I'm washing the dishes, folding laundry, feeding kids, *insert annoying chore here* , I'm putting pieces together in my head.

Another post later on the jacket class. Stay tuned.

Thursday, June 25, 2009

I'm gonna tan me a cow . . Burda #151 Leather Obi Belt

My first foray into leather was a big honking success (I think). I'm glad I did something simple with few seams and easy construction. I bought this red leather at a local beading place called Black Elk Beads and Leather. Alaska has a large population of Alaska Natives who do beadwork. This shop carries leathers, beads, thread, buckles, embellishments, and the like. They also have things like seal skin, sinew, leather crafting materials, and fur. This is not a place for the sensitive animal-lover.

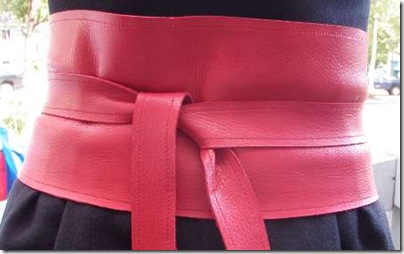
Anyhoo, this is BWOF 06/09 #151. Cidell already did a review of this pattern using fabric. I have wanted to try leather for a while and thought this would be the perfect pattern for it. I did follow Cidell's advice and look closely at the length of the belt. Like her, I realized that the belt would be too long. I took a good 2" out of the center of the belt and 2" out of the angled "side" piece. That's a total of 8" because these pieces were either on the fold or doubled. I also reduced the length of the ties from 35" to 22". Those would be some loooong straps. I do think you need to be careful about how much you take off total. The front should wrap around to the sides and the "side pieces" should overlap at the back so you get that great overlap effect.

bwof_0609_151_4bwof_0609_151_6


The back with the overlap is my favorite part. There is an opening in the side to allow the strap to come through. It's kinda like a wrap dress.

bwof_0609_151_2

I really like the combination with this black dress. It's from BWOF 11/2008 I want to make a berry floral print dress and wear the red belt with that also.


bwof_0609_151_1


Here's the side. You can see the opening in the seam to allow the strap to come through. You can tell I could have shortened it a tad more. I topstitched all the seams to help them lie flat. That and I like the look of the topstitching on the leather.

bwof_0609_151_5

My leather sewing friends. I should have added the rolling leather foot I have. My friend gave me a Necchi machine a few months ago and it came with a leather rolling foot. I used Coats and Clark Heavy Duty thread. For the topstitching I pulled all the threads to the back and tied the thread off. For extra assurance, I used Fraycheck on the seams.

bwof_0609_151_7


Here's the inside seam with the opening.

bwof_0609_151_8

Here's the non-opening side seam.

bwof_0609_151_9

Now, I'll have to make something to wear with this rockin' belt.

Green Pepper #150 Children's Oregon Jacket

Okay, I finally got this puppy done. It turned out well if I do say so myself. I hope it fits until winter. He is growing like a bean. I may have to stop feeding him.

Son: Mom, why do I have to wear this. It's warm outside.
Mom: You just do. Why are your eyes all squinty?
Son: Mom, it's so bright out. I'm hot.


Son: *SIGH* Mom, why do I have to wear the hood?
Mom: Listen dammit*, just hold on a second okay?
Son: *sigh*


Son: Mom, can I go play now? The Sisters** are getting into my sand castle.
Mom: It'll just take one more second. Hang on. Do you have to be so squinty?
Son (jumping and sticking out arms at weird angles): Bttttttzzzzzz. Btttttzzzzzz. See my super ice powers??
Mom: *sigh* Hold still, one more second.


Son (attempting to run away): ICE POWERS! ICE POWERS! I'M FREEZING YOU!!!BBBBTTTTZZZZZZ! BBBBBBBZZZZTTTT! Stop you hot evil woman.
Mom (smirking and being hot): One more photo. This is the last one. bbbbzzzzzttt, yourself.
Son: AAAAAAAAAAHHHHHHHHHHHHHH, I'm burning, I'm burning!!! She's burning me with her evil burn powers!!!!!
Construction note: I decided to add one of the hood reducers. I extended the hood several inches so it would cover more than the original version. But, I didn't know how much to extend it. So I added this contraption so we could expand it if we needed to.


Mom: Okay, this is the last one.
Son: BBBBBBBBBZZZZZZZZZZZZZTTTTTTTT. You said the last one was the last picture.
Mom: Well, hot evil ladies lie. Stand still.
Son: bbbzzt.


I did something different with the lining this time. I bagged the sleeves so I'd have an easier time with the eleastic casings. Usually I have the raw edges of the lining and the outer fabric. Because I bagged the sleeves, I have nice edges that I don't need to finish. Now, when I fold it over the make the casing, I won't be dealing with turning it under twice to finish the edge.


Here's the folded over section without the elastic. I just flipped and stitched. Much easier than flip, flip stitch especially when you are dealing with slick fabrics.
This is where the zipper, overflap, lining, and hem all meet.


I ended up using all three kinds of seam sealant. See this post for my science experiment. I used Seam Grip on the hood and neck. I figured that this would get the most wear and tear and that since it was on the anterior part of the body, it would see the most rain. I did not like working with this sealer. It is hard to apply, stinky, and gets all over everything. It also has to cure for 12 hours which puts the ky-bosch on progress. Even after it was "cured" it was very tacky. It stuck to itself and my sewing machine repeatedly. When I was putting in the zipper, it was sticking to the machine as if life depending on it. If I was using it on flat seams like a tent it would be way easier. The hood is curved and then, of course, so was the neck. If I had a child-sized dress form it would have been easier. I would have turned it inside out and pinned it to the form. Then I could have easily painted the goop on. As it was, it was sort of pinned to my duct tape double. There was a lot of fiddling and I ended up getting it on the floor once and my hands many times. I used Seam Sealer 3 on the arms and side seams. This is easy, easy to use and dries quickly. I used the K-Tape on the hood where I attached the webbing. It worked great for this.


* No, I don't really cuss at my kids. Sometimes I do feel like I should.
** My son doesn't know his sisters' names. Yes, they are identical twins. Do they look identical? Not really. Instead he calls one or both of them The Sisters. Yes, it's embarassing when he says,"Mom, The Sister in the yellow shirt kicked me!"
Wednesday, June 24, 2009

Can I just say . . .

Yum! I'm the proud new owner of some delicious red leather. This is going to become the Obi belt from the June issue. I traced out the pattern but I'll need to take several inches out of the waist. See this review from PatternReview.com. I don't really know anything about leather so I'll have to do some research on cutting and sewing it.


I'm sort of stalled on the kid raincoat. I'll explain more later. Right now I have to take my son for a teeth cleaning.

Sunday, June 21, 2009

Researching Waterproofing Options

I'm making my son a Green Pepper raincoat from this pattern. I've used this pattern before as a winter coat. This time it will just be the fabric and a lining. Because of that, I want it to be waterproof even at the seams. There are several products out there that claim to waterproof a seam. I bought them and tried them out.

I'm a science teacher. I like experiments. I like being methodical. Yes, I'm type-A in a very big way. So, I made four samples and tested the waterproofing ability of each product. First up, Seam Sealer 3. It's a water-based product that claims to "put an end to leaky seams and joints." This product is super easy to apply with a dauber cap and dries quickly with little odor.


K-Tape is a "universal repair tape that can be used on all smooth synthetic fabrics, fleece, and vinyl." It's 18" by 3". For this sample, I cut it to a width of about 1/2". This is a very easy product with which to work. It's just like masking tape that stretches. I did notice that if you stretch it when you apply it, the fabric will gather as the tape shrinks back to its regular length.


Seam Grip is like rubber cement. It smells similar and had a similar consistency. You use a brush to apply it and you should be in a well ventilated area. It "permanently seams, bonds, and repairs tents, outerwear, and gear." This one has to cure for 8-12 hours. If you want to glue two things together you apply a light coating of Seam Grip to both surfaces, let them dry for a few minutes, and then stick them together. Sound familiar? Rubber cement uses the same directions.


Here they are together. I had high hopes for the K-Tape but I think Seam Grip won out in the end.


Here they are after a good washing. I wanted to see how they held up under a washing cycle.


After washing the seams on the Seam Sealer 3 sample started to peel up. And, I think it's actually okay. It's not a glue, it is supposed to soak into the thread itself and make the thread waterproof. It's kind of like Fray Check.


The Test: I pinned all the samples and applied about 3mL to each sample. This fabric (Nylon Burlington DWR) is so waterproof, it was hard to stop the beads of water from rolling off. The bottom, my control, is a sample with no sealant on it. On all samples, I tried to concentrate the water to the seams. Like I said, that was hard to do because they wanted to roll off.


This is what it looked like an hour later. Notice the control sample has visible water spots along the seams.


These were pinned to a cardboard tube to test for water leakage. Of all the samples, the only one to leak was the control (ignore my goof-up at the top).


Overall, how did they do? Well the easiest to apply was the Seam Sealer 3. You just dab it on. I think the most effective one will be the Seam Grip. It acts like a silicone caulk that moves with the garment. I think it will be the best overall. I may use the tape for a large area though. If I decide to embroidery something on this coat, I will probably tape it inside with the K-Tape and use the Seam Grip around the edges of the tape.
Helpful? I figure someone out there has gotta be into outerwear like I am. :)

More Undies

On the potty training front I've been somewhat successful. One of the girls (twin #2)just decided that she's a Big Girl and is now potty trained. I'd like to say I had something to do with it but it was just her. We still have an occasional accident but really, she did it on her own. The other twin?? Well, she could care less. I'm not sure if it's defiance because her sister got so much positive attention for peeing in the potty or what. Twin #1 also talked later and is just waaaaaay laid back in general. Who knows. I'm not worried about it. Right now, I'm just happy I have half the diapers to change. To celebrate I made #2 new underwear and she got to pick out the butt design. She kept yelling, "I want flowers on my butt!!!" So be it. I also tried my hand at piping. I need a lot more practice. I love this pattern (that*darn*kat review on PatternReview.com) because you can use itty-bitty-teeny pieces of left-over knit.


The applique pieces are all from my husband's deceased grandmother. I just love having really cute fabric for appliques like this. Before she died, I think her plan was to make a scrap quilt. She had hundreds of 4" squares cut out. They are all random fabrics. You can tell some are very old. She would love that I am using them. Like I've said in previous posts, I think the most important thing I can do is pass history on to my kids. Their great-grandmother's fabric is part of their history.


When twin #1 saw this she said, "Awwwwww, soooo cute! I want bunnies!!!" So I may use bunnies to lure her to the potty.


Enjoy! We went camping last night so I'm a bit tired. It was just me, a tent, and three kids. I'm whooped.

Thursday, June 18, 2009

Trying to resist . . .

Wool JERSEY from Fabric.com. I've bought some black but never found any colors. They have crimson and gray (and black) .


Wool suiting!


I'm not much of a chiffon gal but I love this.


This is all part of the Vera Lavender collection. Darn them for sending me an email update about their sale!!