Sunday, November 29, 2009

Giftcard Pockets - Crafty Goodness

Here are some more crafty gifty things. I made two gift card holders for iTunes cards. The pattern is super easy. I just cut two rectangles, sewed them RST (leaving an opening for turning), and turned the rectangle. Now you have one very long, skinny rectangle. You fold up part of the rectangle and then topstitch the sides. And then you're done.


I used my snap press to apply little brass snaps to the front. I figure they can use the little pockets for something else once they use the giftcards.


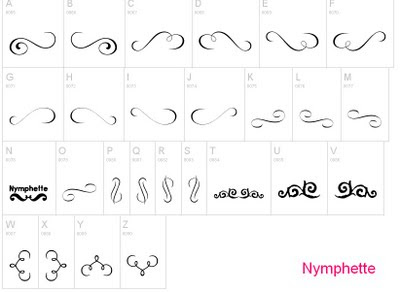
Before I stitched the two layers together, I embroidered the outer fabric for a little texture. I used the Embird Font Engine and used one of the dingbat fonts to add some curliques.

Thursday, November 26, 2009

KS 2605 Girls' Swimsuits

First off, let me just say that I have no idea what these poses are about. They are both a bit crazy.

This is KS 2605. Their sizes in the envelope go from 4-7. My girls are three and skinny for their age. I downsized the pattern by one size and it fits really well. The only thing I should have done is increased the length of the torso by about 1/2" My girls are skinny but tall. This red suit is snug but will certainly be fine for January. I plan on making four suits total and giving them to the girls for Christmas. They'll never remember this suit until they open it on Christmas day. Then it'll be a Gift and that will make it exciting.


Here's another Vogue pose. Weirdos.


It is a nicely designed kid suit. The only change I made is to line the entire front of the suit with swimsuit lining.


I really like the racer back on it.


I have the three others cut out and sewn together but, in my wisdom, I only bought enough elastic for two swimsuits. So the other ones are partially put together. When you assembly line items like this they go together really, really fast.

Happy Turkey Day to my US friends!!

Monday, November 23, 2009

Hawaii bound again!

That fantastic man I'm married to is taking me to Hawaii again! We are going Outside* in January. But, this time we are going with another couple and bringing the kids. I wasn't so keen on the idea until he told me that the nanny is going too. We are splitting her costs with the other couple that is going. It sounds extravagant but the tickets were only $300 and we were renting a house anyway.

To prepare for this trip, I've decided to make the girls swimsuits for Christmas. They will each get two. I went to my local fabric boutique, Seams Like Home, and found this pattern and bought my elastic. Swimsuits are really fast to whip up so I should hopefully have these four done by the weekend. I'm planning on two full suits and two, two-piece suits. I still have a bunch of swimwear fabric from last year. Blogger is not letting me link right now to that post but I will later.


While I was there I also snagged two yards of this fantastic ITY jersey knit. It's it fab? It's a rather big print. Did you notice that it's not purple? Maybe I'm coming out of the purple phase?


*Outside is the term that Alaskan use for the rest of the United States. We also call it the Lower 48 but that doesn't include Hawaii. You often hear Alaskans telling other Alaskan, "Oh yea, we're going Outside for the holidays." Then they say You Betcha and wink. No wait, that's just Sarah Palin.

Sunday, November 22, 2009

Burda 12-2009 #115 The alterations . . .

I really like this new issue of Burda. I am going to make these pants but have to figure out how to alter them. I usually make a size 36 for bottoms and then take in the CB for a swayback adjustment. I sometimes take in the side seams just a bit. If I have to do that with this pattern, how would I do it???? This has a side seam for the waistband and the yoke but the leg sections do not have any side seaming. Don't worry, I am planning on making a muslin.


I may get lucky and only have to take in the yoke piece and waistband. If I'm unlucky I may have to take part of the leg piece. How would ya'll tackle this? I put down, in red, what I'm thinking. I do realize the leg section would have to be sliced to the bottom hem, leaving a small piece attached, so I can use that as my hinge.


Hmmmmm, ponder, ponder, ponder.

All of the bags . . .

Here are all 17 bags. I love all the colors! I finished all the blue and snowman ones today.


I used up a bunch of bright zippers. I may have to buy some more on eBay. That is where most of these zippers came from. My husband bought them when my sewing obsession appeared a few years ago. He also bought be a lot of buttons and other notions.


Erica asked about washing these bags in the last post. To wash these you put them in a garment bag and wash them in the washing machine. My girlfriend, S, just rinses hers out everyday and leaves it to try on the dishwasher rack.

Saturday, November 21, 2009

Ziplock bags . . . sort of

Are these not cute? One of my work friends, S, is an eco-friendly/green sort. Instead of plastic ziplock bags, she carries much of her food in little fabric bags with water proof liners. I think it's a fantastic idea and so I'm making up a bunch for Christmas. S will get some too. S, if you are reading this, pretend to be surprised, okay?? I used the Split Yarn Zippered Wristlet tutorial (it's a link over on the right under the heading Favorite Sewing Tutorials). Today I made 10 but I have about seven more to whip out tomorrow. I used a random assortment of reds and browns. The other seven are blues and winter-themed.


Some of them are lined with ripstop nylon. The fun part of this nylon? This is nylon that has been to SPACE. Yes, you read that right. My grandfather is one of the founders of the Poker Flats Research Range. My grandfather proposed a rocket range in the 1960s that would shoot rockets into the aurora and deliver payloads of various chemicals to the high-altitude regions. You can read about it here. He has a shirt that says, "I AM a rocket scientist." He's a funny dude. Several years ago, they dedicated a building to him and gave him the parachute of the most recent rocket launch. Being The Fabric Queen, I ended up with some of it. My dad will be getting the baggies that are made with the parachuting material. He'll think it very fitting.


The majority of the bags are lined with XLT Burlington outerwear fabric.


The best part is that I got to use oodles of fun, old zippers.

Thursday, November 19, 2009

Let's talk embroidery, shall we?

Remember this embroidery from the other day? I have been playing around quite a bit with my embroidery machine. I love big, bold designs. I bought the Embird software quite a while back so I could place several embroideries together and make stitching faster and easier. When my girlfriend asked me to embroider her Christmas stockings the other day, I went ahead and bought the Font Engine plug-in that goes with it. I figured that I could either pay for each individual font or buy the Font Engine and convert my own fonts. My favorite font site is http://www.dafont.com/. They have oodles of nice, good, and free fonts. With Font Engine you can download any font and digitize it for an embroidery machine. While not all fonts digitize well, the ones I have tried do work very well. For each character there is an outline and a fill stitch. You can modify each of those options so you get just the look you want. I often choose to do away with the fill and use only the outline instead. For example, let's look at the designs in this picture. I omitted the fill in the three designs. On the leftmost design, I used a Bean stitch for the border. On the middle design (my favorite) I used the Redwork stitch. The bottom one is one I just messed up on. How fun would it be to have overlapping stitches, colors, and designs? With Embird software, you can do all of that.
So here is where I found the loops for the above designs.


Here are some other fonts that would be fun on jean pockets.


I've used this already on a knee patch for my son.


Even this curly alphabet would be fun with big, outlined, enlarged letters. With Font Engine you can skew, slant, enlarge, and change the letters. You can make your letters up to 12" big.


And, by the way, I'm not affiliated with their business, I just really like the products. Enjoy!
ETA for Beth: All you have to do is download the font to your computer and, once in Embird, click "Insert Font", type your text, change it to your specifications, and hit okay. Then you just save it like normal. Without extensively tweaking the fonts, you could do this in a matter of minutes. I haven't played with it much but I think it would be easy to have it from font download to embroidery design in about five minutes. I 've been doing mine in about 10 minutes but that is because I'm tinkering with all the options and then looking at it in the 3D mode to see if I like it. The 3D view is a surprisingly accurate way to see if you'll like the design once it is stitched out.

Tuesday, November 17, 2009

The Whole Kit and Kaboodle (Jalie 2215)

You guys should know by now how much I love Jalie. This is the third and fourth time I've made this pattern. The first two times were running shirts (here and here). This is the first time I've made the pants. Unsurprisingly, they fit well straight out of the envelope. First, let's talk tops. I made this turtleneck by sewing the top together and not slashing the polo opening. Then I made the front of the scoop a little bit deeper. When I measured the circumference of the top it totaled 16" so I made my neckband 15". I wanted it to be snug versus really slouchy. Then I quartered the top and collar and attached it. This is a fabric my husband bought for me during one of his many Houston trips last year. It's an organic cotton with little holes in it (scroll down on the link above and you can see a close-up). It is a dense enough weave that I don't have to worry about any bra peekage. Pardon the funny faces but it's 3° outside right now. ETA: I should add that the shirt is just an undershirt. I don't run in cotton shirts. I would freeze my everything off.


Next, the bottoms. The bottoms are a size S which is two sizes bigger than the top. I'm a true pear-shaped woman. These pants are made out of a very thick bottomweight four-way stretch knit I bought from the Fabrics and Notions coop group run by Ressy (thanks EFQ!). The only change I might make next time is to flair the legs just a little bit more. These are also a cotton mix so I wear them at the gym and as lounge pants. I won't wear these when I run outside either.


And the requisite butt photo.


I really like how the pattern is lower in the front and higher in the back. No one wants butt cleavage on the track.


Hmmmmm, next up? I'm not sure. The kids probably need more winter stuff. It's been chilly, chilly here.

Sunday, November 15, 2009

Burda 09-2009 #130 Cropped Vest

Remember this little ditty from 09-2009 Burda? I love vests and I needed something different for my wardrobe topper. I have decided that I'm not a jacket kind of gal and maybe I should stop making jackets that I will never wear. Instead, I used the remaining wool twill from this recent jumper and made this vest. This, I will most certainly wear.


I went with the mother of pearl buttons that so many of you suggested. I really like how they are neutral but kind of dressy at the same time.


The back is my favorite part with that high slit.


The buttons were made with my Greist buttonholer on my Necchi BU Mira.


I finally conquered that Burda technique that they show with the wooden spoon. It's pretty easy when you actually follow their directions. You pull the vest right side out through a 6" slit in the CB lining. Later you hand-stitch that puppy back together.


Let's see, some details for ya'll. I took in the side seams about an inch on both sides. I made no other alterations except leaving off the topstitching, tubular braid, frog closures, and snaps. Brian, it took me almost no time to make this vest. It's only six pieces (three fashion fabric, three lining) with no challenging sewing. I think it probably took me four hours of solid time from tracing to buttonholes. Like everything, the pressing and finishing things like buttonholes and hand-stitching took the majority of time. Actual time at the machine might have been an hour but I doubt it. I highly recommend making vests because they don't require much fitting and they are simple and fast to put together.

Saturday, November 14, 2009

Buttons - Better pictures

I realize that those last photos suck. I took some on the front porch. It's a cold but bright day. I think I'm leaning toward the mother-of-pearl ones now. They are the top ones.


As soon as I get it done, I'll take some pictures and answer Brian's question. Stay tuned.

Buttons -- Help!

Man these photos are horrible. I decided that I'm just not a jacket kind of girl. I am going to take the Chanel jacket out of my Wardrobe Contest plans and use this vest instead. It's a Burda pattern and I'll show it to you in detail once I figure out the buttons. What do you think readers? My favorite is #2. I did a close-up of the buttons at the very bottom because these pictures are so horrible. I may have to brave the weather and take a photo outside. It's about 8°F out there.

#1 is a lavender-y plastic button. I am debating the number of buttons too. I could do three or four.


#2 is a plastic button that is made to look like those leather buttons. There is a close-up below.


#3 is a black/mother-of-pearl button. You can't tell anything about it in this photo except for size.


I also put in two other potential buttons: black and gray. And, of course, I could go buy some but I'd rather use ones from stash.

Friday, November 13, 2009

I've been dreaming of jeans again.

My router is dead so I am forced to post via my iPhone. I'll keep it short and sweet. Look at the fun pocket embroidery designs I've been testing out. Won't these fun on a back pocket? Details coming with links as soon as I can get to a real keyboard.

I am trying to see if mobile blogger works with my phone. This is just
a test of the emergency broadcasting system. Or whatever. Daughter #2

Wednesday, November 11, 2009

Kwik Sew 3576 - Another jumper

Remember way back when? The first time I made this jumper in February of 2008? I loved it then and I love it now. My sewing skills have come a long way since then. When I made it the first time, I had only been garment sewing for six months or so. The fit and construction are much better this time. I made this out of a gorgeous purple twill wool. I bought it from Ann over at Gorgeous Fabric a long time ago but never wanted to cut into it because I liked it so much. It has pockets and a belt. I do not have a belt buckle for it yet. I made this jumper at the original length. The first time I lengthened it. The more I sew, the higher my hemlines seem to get. I think this is a great length for boots and tights though. With the other one, tall boots seem to be too much. I'll wear it with a turtleneck like this. It could also be worn sleeveless. I also lowered the front neckline by about a 1/2" and raised the back neckline by the same amount.


Here I tried to lighten the colors a little so you can see details. Now that it is darker earlier, I am reduced to taking inside photos again. I used Coats and Clark Heavy Dual thread in a gold color.


Here's another light one that shows the bust darts. It is shaped by two front waist darts, two back waist darts, and two bust darts. The waist darts are all partially concealed by pockets and belt loops.

The true color is just a bit darker than this.


I'll try to get some natural light photos but the sun sets by 4:30pm and it's twilight-y for an hour or so before that.