Friday, July 31, 2009

Crushed Velvet Dress

This is Burda 08-2009 #113. I love the fabric they used on this dress. I have some poly/lycra stretch velour and decided to try my hand at crushing it myself. The design is pretty simple. I didn't want to just use plain velour because I thought it would be too boring.


I took a scrap of purple velour and roughly pleated it with my fingers. I turned the iron to Linen, it's hottest setting, and pressed the pleats. I was a little worried about meltage but it was fine. I got this idea from a Threads video I watched a quite a while ago about crushing silk/rayon velvet. This purple velour has been crushed several times. Then I washed it and dried it. I figured if I went to all this trouble to crush it, I didn't want it coming out in the wash.


I don't have enough of the purple so I'll be using this printed velour below. I think the print and texture will work well for this dress.


I'm going to go trace it out. It's one of the rare patterns that comes in a size 34 so I don't have to grade it down. Yay!

Couture Jacket Class -- 7

In my last jacket post I showed you the collar and all the padstitching. I forgot to add this picture. This is from the undercollar side and it shows the turn of cloth. I has always read about it and it made sense but I never got anything that was a great example. This collar is a good example of that. The upper collar is a bit longer and wider which causes it to slightly turn to the underside.


from Threads magazine (here's the whole article):

Why does it matter?
On a beautifully sewn collar and lapel, the enclosed edges turn neatly under to the wrong side, and the seam is not visible from the "public side" (the side that shows when the garment is worn). If the turn-of-cloth isn't taken into consideration, the upper collar and lapel area of the front facing "steal" some fabric from the under collar and lapel, causing the seams to curl back to the public side.


After the collar I attacked the arms. These are two piece sleeves with bias-cut canvas in the sleeve cap and sleeve hem. This sleeve has a rounded sleeve vent.


Here's my free sleeve form. I use a giant cardboard tube. It's comes from the bulletin paper rolls at school. They are stout so I can press on them many times before I need a new one.


The sleeve vents were very fiddly and took me a whole day to put together. When I say "whole day" I mean a whole day with kids "helping". I probably could have gotten it done in a few hours if I was alone. It's a lot of hand sewing and it's all pretty small.


Here's the finished vent from the outside. It's weird because there is a raw edge on the inside. I'm sure that isn't how it's supposed to be but it's there and the lining won't cover it because it goes all the way to the hem. I read the directions repeatedly and I think it's the way it's supposed to be although it doesn't seem right.


Next, I lined the sleeves. You line the sleeves before you set them on a couture jacket. To attach the lining to the sleeve, turn both of them inside out and loosely sew the seam allowances of the lining to the jacket. Turn them both right side in and voila . . .


. . . lined sleeve.


For the sleeves, I machine basted, pin basted (see Ann's tutorial about this), and hand sewed them in. Once it was okay, I machine basted them. Then, I permanently sewed them in.


Don't sew over pins. I did but it was nerve-wracking. I use the tip of my tweezers to push down unruly parts of the sleeve.


Here it is from the front. I have it pinned shut and it's not exactly lined up correctly. There are no shoulder pads in here and I'm debating not putting any in at all (shush! Don't tell Linda!). It fits better without them but I am worried about the chest caving a bit because I am pretty hollow between the shoulder and bust. This jacket has a layer of horsehair canvas in the entire thing plus it has a quilted shoulder region. So there are two layers of horsehair in the shoulder area. What do you think? Do I do the shoulder pad thing anyway? It makes the armhole (armscye?) really tight.


The back doesn't fit as well as I would like. There is a bit of a bubble between the shoulder blades. I'm not sure how to get rid of it but maybe a good pressing will do it? Then the mighty swayback is also there although not bad. At this point, I don't think there is anything I can do about them. I don't mind cutting my catchstitches and re-sewing but I don't think that is what needs to happen.


You can see the top bubble when I pull my arms forward. It's almost like there is too much fabric vertically. We added an inch to the back so it might be that there is too much fabric there. I really struggled putting the sleeves. I took out and put in the right sleeve about six times. After that I was worried about the fashion fabric so, even though it's not perfect, I think I'm going to have to let it go or risk destroying the fabric.


I still think it looks okay especially from the front. I do think I forgot about fit and focused on the details too much.


I still have to figure out the shoulder pad thing, put in the main lining, add buttons, and do some handstitching.

Wednesday, July 29, 2009

Burda 08-2009 #110 High-Waisted Skirt

Ok, here it is bigger. I'm not sure why I couldn't upload to my server last night but it's all better today.


I love this skirt. They show it well in the magazine in the Paris Chic section. It's below the knee and above the waist by about an inch.


I really like how it looks. I have any other high-waisted skirts or pants but I think I will make more. I was worried about them being too uncomfortable but this one is very comfortable. I made it in a very neutral black/white houndstooth from Gorgeous Fabrics. It's left over from this dress. I'll need to make some blouses to go with the skirt. I mostly wear fitted knit tops during the school year. Now, I'll have to mix it up with some blousier things.


It's weird but my butt looks a lot less swayback-ish. I did make a large (1.5") swayback tuck.


I'm not sure why I have the wrinkles in my right hip but they are so subtle, I'm not gonna worry about it.


I did something totally different this time with the lining. The lining is orange Ambience I had left over from some projects. I edged it with turquoise bias tape.


Here's the skirt vent.


Many of you have asked how I get some a clean finish on my skirts. You have asked me to do a tutorial. When I did this skirt, I made sure to take lots of pictures. A tutorial will be coming shortly. This is not my technique, but instead a technique I gleaned from Kathleen Fasanella over at Fashion Incubator. Here's part one of the invisible zipper tutorial and here's a link to all her tutorials. Check them out, they are great.


A close-up of the skirt.


Why am I not working on my jacket you ask? Well, my husband bought me coffee so I'm jittery and unable to concentrate. I can handle a skirt. But a couture jacket with hand sewing? No way. With any luck I'll be done (mostly) tomorrow.

Tuesday, July 28, 2009

Answers to Questions

Another exciting installment . . .

Shiny Green Penny has left a new comment on your post "Jalie 2215 -- In Red":
LOVE this top! I would like to make it out of a wicking fabric for paddling and running....what alterations did you make (other than adding 4 " to the bottom....I am beyond flashing my navel to the world...after a couple of kids no one would be looking at mine anyway :-)Did you simply leave off the polo collar and not cut the opening? Or something different? Thanks!
All I did was not slit the opening for the polo top. I did cut off the seam allowances to add the neck band. Otherwise, it would have been very high.

Cindy has left a new comment on your post "Simplicity 2922 - In silk":
How is the macaron coming along. I have one in process at the moment! I can't decide if I should add the sleeve or leave it sleeveless!
I don't have the perfect fabric for it and so I'm stalled on it. I do really like the shape of the dress but would hate to pick hideous fabric.

Myra has left a new comment on your post "Simplicity 2922 - In silk":
Wonderful fabric, did it come from High Fashion? I bought silk there once to have a dress made for SIL's wedding. The store is in "Chinatown", really Vietnamese. (I am from Houston).

Yes, my husband knows where High Fashion Fabrics is already so it's the only place that he goes. Us Alaskan folk ain't used to crazy city driving.

Lindsay T has left a new comment on your post "JSterns -- The Tee -- 0041 -- Take Two":
Nice! Did you ever consider turning the stripes vertically for the yoke piece?
As soon as I was done I thought to myself, why didn't I make that vertical?!?!?!

Anonymous has left a new comment on your post "Comment away . . . I dare ya":
I wanted to ask you thing anyway - what better time than now. It's an Alaskan question, rather than sewing. Can you recommend a place to purchase wild salmon for shipment to the lower 48? I'm blogless, so this won't count for a 'prize'.
Thanks,
VtMartha
Hmmmm, that's a tricky one. We always eat our fish here and ship it to our relatives ourselves. I have heard good things about Northwest Seafood. I think they do a good job.

Ivalyn "Tee" Jones-Actie has left a new comment on your post "Comment away . . . I dare ya":
How did you get your eyeballs up there! I love to know how?
Thanks

The lovely Angie from Quality Time did it for me.

eword10 (http://eword10.wordpress.com/) has left a new comment on your post "Questions and Answers":
have a question about your snap press... Do you think it's not worth buying the Prym vario snap kit (http://store.atlantathread.com/prvakit.html)? Is it too chintzy? And that's why you bought the snap press?
Inquiring minds want to know! Thanks!

I think if you aren't doing many snaps or if you don't want industrial strength the Prym is probably fine. This snap press is super easy to use and these puppies doesn't come apart once you set them. I don't have any experience with that particular brand though either. I had some really old crappy ones that bent ever time you tried to use them.

Rosesred has left a new comment on your post "Researching Waterproofing Options":
very cool post, and very useful as I´m getting ready to make my own raincoat. Where did you get all this stuff? I´ve been asking around in stores for this kind of thing and nobody knew what I was talking about ±P

I found all of these seam sealers at a place called Alaska Tent and Tarp. They make, well, tents and tarps. It makes sense they would have seam sealing things. I never thought to call them until my husband suggested it.


This is nice too.

I was inspired a while ago by Amanda's simple top. Maybe this one would be better for the patterned silk?

I will get you a photo of the fabric on me. I particularly like Amanda's version because I think I could wear it with a black turtleneck in winter for a bright pop of color. I agree with you guys who said the flounce-y thing would get lost with the bright, busy print. I think the same thing would happen.

This is 11-2008-something.


Monday, July 27, 2009

Too much???

I have this gorgeous piece of silk charmeuse my husband bought in Houston. It's a pretty big print with the circles being about 5" in diameter. I want to use it in a simple top to showcase the fun fabric.


I really like these two patterns out of the new August Burda. Would it be too much to have that big print with a tie or flounce? And remember I'm a pretty small person too. Would it be too overwhelming on me?


If I used the one with the flounces, I would be careful to match the center front.


I'll probably end up making this skirt too because I love it and school starts in about three weeks.

Couture Jacket Class -- 6

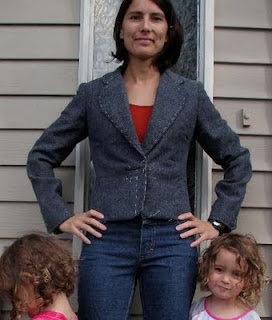
It's been a while since my last jacket post. Like I said in an earlier post, the jacket is not done. I repeat, the jacket is not done. I hate that it's not done; that bugs me. So, to kick my butt into gear, here is another synopsis of what I've done.


The last update I gave you showed the lapels being pad stitched. Here is the final lapels after the padstitching but before the facings. After this we did another fitting. The coat is only basted together at this point.


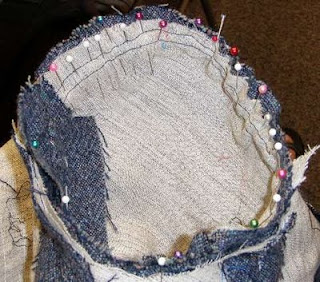
I ended up taking in the center back and side/back seams about 3" overall in the waist. The chest and hips we pretty much left alone. I permanently stitched the seams and then graded and clipped the seams.


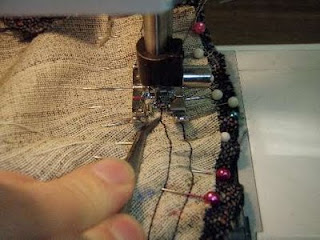
Here's a lovely photo taken by Paulette which is showing how much of a mess I make compared to all the other ladies in the class. I was busy grading and clipping. Gee, thanks Paulette. After this, I catchstitched all the inside seams to the interfacing. I thought I took a picture of that but I guess not.

Then, we move on to the collar. This has a lot of padstitching too. There are three specific parts of the collar. The first is the roll line. You, of course, want that to roll down the neck. Second, you want the main part of the collar to roll around the neck. Third, you want the tips of the collar to lay flay against your jacket.


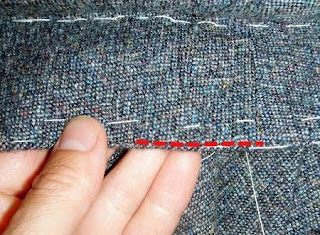
Here is one of the corners.


Here it is on the table after I finished padstitching it. It wants to roll the right way.


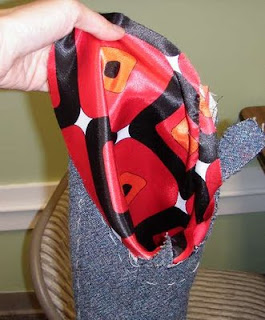
Before I attached the facing I had to choose buttons and do my welt buttonhole. I chose self-fabric buttons because I want them to be neutral. The one on top looks cheap and shiny because I used one layer of fabric. The bottom one, which I'll be using, uses two layers of fabric.


My welt buttonhole wasn't nearly as difficult as I thought it would be. I used my Reader's Digest Complete Guide to Sewing and The Complete Book of Sewing Shorts Cuts by Claire Shaeffer.


You can barely see it in the fabric unless I hold it open.

Here it is from the back.


Next up: Attaching the collar and the sleeves.

Saturday, July 25, 2009

Book Score

We have this great book store in Anchorage called Title Wave books. It sells new and used books. It's one of those places where you can bring in used books and get "credit" for them and use the credit to buy other used books. Look what I scored for under $30. I've wanted the David Coffin book ever since Melissa of FehrTrade.com raved about it. I've read about of a fifth of it already and I just bought it yesterday. I'm going to have to make my husband some shirts. Well, we'll see if he can hold still long enough. I love how Coffin breaks it down and he draws out everything he describes.


I also found two of these Threads books. They are compilations of previously published Threads articles. They are dated (both published in 1991) but both of them offer in-depth looks at designers, fitting, drafting, and techniques. I think I'm really going to enjoy them both. I have previously checked out the Fit and Fabric one from my library. I liked it then but I find that I understand so much more of what they are talking about now that I have a little experience under my belt.


I figured I deserved a treat after yesterday. My lovely helper-devil-children put, what I think was, a diaper down the toilet. Of course it plugged the sewer line and sewer water flowed into my laundry room and downstairs bathroom. My father-in-law and I spent about four hours snaking the sewer line until we pushed out the mass of nastiness. Then it took me another four hours to completely bleach and clean the bathroom and laundry room. I love them, I really do. Thankfully, my mother is in town so she was able to watch them while I was up to my elbows in shit. Literally.

Jalie 2215 -- In Red

I love this raglan top so much. I made another version without the polo opening and with 3/4 length sleeves. This one is from a cotton (I know, cotton kills!) from our local Seams Like Home. I really like the sporty look of the fabric. I do prefer running in cotton and natural materials because the other ones get so stinky. Even when you wash them every time you run they still stink. I've even tried the bacteria barrier fabric that isn't supposed to get sticky. But, it does.


Here you can see the texture of the knit. It's really soft and comfortable to wear.


I, again, added another four inches to this top. This is supposed to be cropped but I'm not so into that look post-babies.


I love the stripe on the arms. It's swimsuit material from Spandex House. I made my mother a swimsuit out of this material back in January when I was getting ready to go to Hawaii. For this top, I didn't want to try to fold it over on itself because it is so slippery. Instead, I used my coverstitch machine to stitch the swimsuit material (single layer) to the red knit.


This is what it looks like on the wrong side.


Next, I trimmed close to the stitches. It's not perfect when you look close up but you'll never notice from any distance. It won't fray so I'm leaving the edges as they are.


An update on the Vogue jacket: it is not done. I know it was supposed to be done to meet Claire Shaeffer. But, I don't feel too bad because no one in the class finished their jacket. But, I got a call from my instructor last night saying, "Dawn, I've been checking your blog and I don't see any jacket work." [hanging head and looking sheepish] So, she is checking on us (Hi Linda!) and I will get it done before school starts. I needed a break from it . It is hard from me to work slowly on something for a long time. I get frustrated with not making much progress. At the same time, I knew that I shouldn't get too far ahead because I would miss important things and not be able to correct them. So, I'm going to make a big push here in the next week and get that puppy done. I do owe you several posts on where I am with the jacket. They will be coming too.

Thursday, July 23, 2009

Simplicity 2922 - In silk

Dress is done. I really like it. I think it's a great simple pattern for this silk. This is another fabric my husband brought back from Houston. Here I have my helpers who wanted to be in the photos. Yes, we wear pants with our princess dresses. It's summer but it's only about 54 degrees F out there.

The silk was one piece with a loooong painted section and a shorter section. I put the shorter section on the front and the longer section on the back. I did cut a short section of it off because it went on for another 8".


Here it is without the helpers. You can see the front motif ends at about the belt.


It's hand-painted silk and it's supposed to be bamboo leaves. It has a little bit of white and gold in it. This is the true color of the green.

It was really hard to get close-ups of this fabric. It is very matte but when it sees a flash it suddenly looks shiny. This is a close-up of the hem and print. It's really hard to photograph close-up.


Seeing as I went to the Claire Shaeffer class on Sunday, I wanted to practice one of her techniques. This technique uses interfacing in the hem to add a little weight and to smooth things out. For reference, I used a 2" hem. The interfacing is a scant 2". I actually used bias tape I had in my stash. It was the perfect width and it was already on the bias. First you use a blind hem stitch to stitch the interfacing to the hem. You attach them at the hemline. ETA: Claire said you can use anything from a fine silk organza to horsehair canvas to support the hem. The key thing is that is must be on the bias so you get a nice curve. She also said you could interface as high as you want. She specifically mentioned a full-length dress. She said she might interface to above the knee so the dress didn't "break" under the knee. I think she means that it will fall smoothly all the way down to the floor when you sit or walk. She was full of so many good tips and stories. I want to try to use her techniques in the coming weeks so I can always remember them. Well, and I keep a sample book with samples of stitches and notes. I refer back to it often when I'm doing things like welt pockets, welt buttonholes, hemming, etc.


Then you fold up the hem and do another blind hem stitch.


I added some red so you can see the pattern of stitches. On something thicker, you would use a blind catchstitch. It's stronger than this stitch.

Wednesday, July 22, 2009

JSterns -- The Tee -- 0041 -- Take Two

This one is soooooo much better than the first version. Remember the way too tight version? This is medium with measurements of b: 34" and h: 37". I'm more of a b:32"and h:36" kind of girl but I like the fit of this much better. This is buttery soft cotton jersey from the Fabrics and Notions coop. It has very little stretch.


No petite shoulder to bust tuck for me. It's weird but I swear I don't need that tuck anymore. I have a dress to show you too and I think I could have gone without the tuck. Look, I almost look busty.

I serged the hems on the sleeves and bottom.


The hems naturally roll which is the way I like it.

Tuesday, July 21, 2009

Comment away . . . I dare ya

ETA: These are the people I will be sending things to: Gail, Robyn, Cricket, Amy, KiltsnQuilts and Dale. I know that is six but I'm not sure if KiltsandQuilts wants to participate. I know the directions say I will contact you but not all of you do not have emails on your blog and I have no way of replying to comments. Send me an email instead info 'at' cabinbaby 'dot' com with your mailing address. Then we'll get this started. :) If I don't hear from these people in a few days, I pick alternates. Stay tuned . . .

So I got this from Christina's blog. It sounds like fun and I haven't done a give-away thing in quite a while. So comment away. I've been feeling in quite the devious mood lately so you never know what you might get. Mwaaaaa haaaaa haaaaa. The following is copied from her blog:

Here's how it works:

The first five people to leave a comment on this post will get something from me.
But in return, you have to do the same thing on your blog and make something for five other people.
The details are as follows, and if you want to play, copy the following onto your blog and leave me a post:

1. I make no guarantees that you will like what I make. Whatcha get is whatcha get.
2. What I create will be just for you, with love.
3. It’ll be done this year (2009).
4. I will not give you any clue what it’s going to be. It will be something made in the real world and not something cyber. It may be weird or beautiful. Or it may be monstrous and annoying. Heck, I might bake something for you and mail it to you. Who knows? Not you, that’s for sure!
5. I reserve the right to do something strange.
6. In return, all you need to do is post this text on your blog and make 5 things for the first 5 to respond to your blog post.
7. Send your mailing address - after I contact you.

Okay get busy and leave me some comments so I can get busy making you something.

Oh, and it's thanks to Angie that my scary eyeballs are lookin' atcha. {grin}

Monday, July 20, 2009

Colette Patterns - Macaron - Muslin

I'm not looking great but here's the muslin. I have some tweaks to work out I think. Overall, it fits well. I like the style and it makes it look like I have a bust. This is the size 0 which has these measurements: b:33", w:25", h:35". My hips are about an inch bigger and my bust is an inch smaller. I didn't put in the zipper; I just pinned it shut. In some of the photos you can see some weird fabric poking out from there. (Excuse the big honking wrinkles in the back skirt; it's a muslin.)

Fit problems- (1) I've been working on a sloper pattern with the help of my jacket instructor. She said I have a narrow chest but wide shoulders. I put the pattern on top of my fitting shell and decided to leave it alone except for moving the shoulders out an inch. That might have been a bit too much. But, can you imagine how tight it would have been across the shoulders without that extra 2"? (2) The waistband of the dress hits me at the bottom of my ribcage, not at my natural waist. This does make my legs look unnaturally long but is that the way it is supposed to fit? (3) It is tight, tight, tight at the midriff band. I think that if I added an inch or so to the bodice and moved the midriff band down it would solve problems (2) and (3). Right now it's at the ribcage and not at my narrowest part. (4) This dress is unhemmed. I will add an inch or two to the bottom since this is as short as I want this dress. (5) This dress is designed for a C cup. I will do a tiny SBA tuck to get rid of any extra bust space. I was surprised that it wasn't super big on top.

Pattern problems (maybe): (1) See how the top of the back bodice is all wrinkly? I really had to ease it into the bodice bottom piece. It seems to be extra wide. The khaki fabric is a stretch twill and I had to stretch it to fit the white. I'll take a tuck out of the white piece in the back and leave the khaki piece alone.


How do you like it? eta: I made the pictures bigger so you can see the details. Also, like the new red shoes? My husband, I love that guy.

ETA: I was getting a lot of SPAM on this post so I locked the comments. Feel free to comment about this dress on later or previous posts. :)

Sunday, July 19, 2009

Claire Shaeffer and Other News . . .

I rushed home on Friday because I was scheduled to have a class with Claire Shaeffer today. There was a presentation on Saturday and there was a class Sunday afternoon. Unfortunately, I was only able to go to the Sunday morning class. My husband is gone right now and I had a hard, hard, hard time finding childcare. MIL is out of town, nanny could only do a morning gig, husband's gone, other sitters have summer jobs, neighbor boy is out of town, etc. I really wish I could have done a full day with her today. I learned so much in the four hours I was there. I made a turned tube that is about a 1/16" of an inch wide. Really, people, it can be done. That's the tube below. She had us do one with a charmeuse. When I came home, I did it with a spare piece of duppioni. I wouldn't have believed it either. I won't share the Shaeffer secrets but I do highly recommend this book. This technique is in this book as well as the Couture Sewing Techniques book. I got an older version of the shortcut book at a garage sale for $2.00.


Besides doing the amazing tube turning we also did several hemming techniques. I plan to use the interfaced version on my silk dress so you'll get to see that one in action. We also learned the basic catchstitch and blind hem stitch. Basic stitches but it is nice when someone is walking around saying, "Too loose, too tight, too far apart, etc." We were running late during the class so I didn't get to see the bound buttonholes technique. My nanny had to be to work by 12:30 and the class ended at 12:00. I was out of there by 12:02 so I could make it home in time for her to get to work. Claire said she was teaching that next. Sigh. I would have really liked to see that. As a person, she is very nice with a dry sense of humor. She's a great teacher too and lets you work at your own pace. As we finished something, we would go up to her and she would show us the next technique in small groups. I just wish I had more time with her. Oh well, hopefully there is a next time.

*******************************

I have this pattern cut out in muslin so I can test the fit. This is a new pattern company called Colette Patterns. They have four dresses and one skirt for their spring line-up. The sizing seems like it was vanity sized quite a bit. I know I'm a smaller person but I'm a size 0, the bottom of the size range. There are lots of people smaller than me. I should have that sewn up in a day or two.

Next, I have this dress cut out in a hand-painted silk crepe. Well, I think it's a crepe. It's one of those fabrics my husband brought back from Houston. He just knows fiber content, not weave. It's a heavier-weight drapey fabric. It's really pretty. Hopefully I'll have that done in a day or two too.

The longer motif will go on the back skirt and the shorter one will be on the front skirt.

Saturday, July 18, 2009

Miss Me??

Holy smokes am I ready to settle back into a routine. Week-long trips with the kids are fun but maybe we shouldn't schedule three week-long trips in a row. The kids are a bit out of whack and I'm a bit cranky from sewing withdrawals. It was a fun trip and I'm minus one child (stayed with grandma an extra week) but wow am I ready to sleep in my own bed.

So I did manage to make a running top right before we left for Fairbanks. I mean just before we left. I coverstitched it the morning of the car ride. I knew it would be hot there (in the 80s and 90s!!) and I didn't have anything for hot weather like that. Remember way back when when I wrote the 600th Jalie review and won a free pattern from Jalie? Well, I bought Jalie 2215. It's this top, this top with long sleeves, running pants, and skirt with underwear panel. I plan to make all the versions. It's the perfect pattern for me. I made this top out of some of the bamboo/cotton/lycra knit I don't like. And actually, I don't hate it here. It's really light so it works well as a running top. The accent panels are from Paulette. She's a blog/internet friend who turned into a real friend. She's the one who convinced me to take the Couture Jacket class. She had cut out a top incorrectly and thought I might be able to do something with the pieces. She was right.

Yea, yea, I could do a swayback adjustment but it's fine. I ran 12 miles this morning so excuse the hair and un-bathed-ness. And I know the hat is nasty but it's my Running Hat. You can't run without your Running Hat. Someone has asked what I'm gearing up for in a previous post. There is a half marathon in August I like to run and I'm doin' it again this year.


A little close-up of the collar and shoulders.


I think I'll make a version with no polo opening. I like it but it'll be nice to have some without it too.


I'm not impressed with my topstitching but, like I said, I was in a hurry.


I had so little fabric that I had to slice and dice it to make it big enough for the undercollar. With this busy print, you'll never notice.


I am planning on sewing a lot the next week or so so my blog should be hoppin' the next little while. So. Glad. To. Be. Back.

Saturday, July 11, 2009

Runners Unite!

So I did a tiny bit of sewing right before my Homer trip. I have had an iPod for a long time. I mostly play podcasts and audiobooks while I run. Weird, I know. My absolute favorite is PodRunner. If you are a runner/spinner/exerciser you should check it out. They publish a new mix every week at a specific BPM (beats per minute). It really helps keep your pace through the entire run. My pace is about 158bpm so I have downloaded about 10 mixes for that pace. I wouldn't really call it music. It's kind of like techno music but it lasts for an hour. I don't even really listen to it. I turn it down way low, just so I can barely hear the beat, and let my mind wander. Anyhoo, my girlfriend bought the Nike+ thing that attaches to your iPod. After looking at hers, I had to buy one too. They are super cool and not that expensive. There are two parts. One part goes in or on your shoe. Nike shoes have a special pocket in the shoe for the transmitter. If you aren't a fan of Nike shoes (too narrow of a toebox for me) you can buy this little pouch that straps to your rebel non-Nike shoe. The other part is a little white receiver that attaches to your iPod. You can see it on my iPod below. I usually keep my iPod in one of my butt pockets along with my Gu (I have goo in my butt, ha!). But, this little gadget shows you your pace, distance, time travelled, etc. so you want easy access to it without fumbling in your butt (hee hee). I looked at the armbands that they make for your iPod. Those things are $30 or $40! Can you believe it? That, and they probably wouldn't fit my tiny biceps anyway (child's blood pressure cuff here). So, all this background just to tell you about the elastic armband I made. Whew.

Here are the components together.


Here's the sensor in the pocket. And yes, my damn Puma shoes are pink and glittery. Not my first color choice but they are pretty damn comfortable.


I usually wear this sleeveless but you get the idea. I wear it upside down so I can pull my arm up and see it right side up.


Here's the nitty gritty. It's pretty easy obviously. I put several rows of loop-side velcro so it can be adjusted. You just have to be careful because the velcro doesn't stretch. No use putting non-stretch things on an elastic band, right?


You can see the metal buckle I found isn't quite wide enough for the elastic. I made the 1" strap very tight so there is no chance the iPod will slip out.


Here's how I put on the smaller elastic so I had all finished edges.


It's not much but I did sew something.

Friday, July 10, 2009

Homer - Non-Sewing Photos Ahead

Well, it's no-sew time for me again. We've been in Homer for a week camping, clamming, fishing, and hiking. There is nothing to rev up your sewing mojo like a lack of time to sew. I'm feelin' the itch bad.

We spent several afternoons on the Homer beach. Yes, my kids are wearing coats and long pants. It is warm by Alaskan standards but wet kids, wind, and temperatures in the sixties make for cold little kids. They had a ball trying to stay out of the water and picking up random beach things.


We spent a day fishing for halibut. I need one of those grandpa shirts. You know, the ones that say, "My grandparents went all the way to ________ and all he brought me was this damn t-shirt." You've seen those shirts right? Well I went all the way to Homer and all I caught was damn cod. They are good to eat but wormy. They are so parasitized that several of the fillets were reduced to thumb-sized chunks. Eating roundworms is not one of my favorite things. We know, of course, that we didn't get all the roundworms out of the meat. You just try not to look too closely when you eat it. It's the same with all cod, even the stuff you buy at the store. Cod is a heavily parasitized fish. Period. Next time you eat cod, try not to think about it. So, this is girl #2 with her first cod catch. We caught about 25 of the things. They wouldn't stop getting caught.
ETA: Sorry to make you guys not want to eat cod. I shouldn't also tell you that halibut is heavily parasitized too. Well, salmon too. Parasites are a part of life. You, in fact, have parasites all over you. As long as you cook it well, you'll be fine. Any game meat can be subject to worms too. That's part of the reason why you cook them to a certain temperature.


This is girl #1 with her cod. It's almost as long as she is.


We spent a day inside of Halibut Cove and rented a Forest Service cabin. Only about 5% of Alaska is owned by private individuals. They other 95% is owned by state and federal governments. Much of this land is parks, preserves, and national forest land. While you can not buy this land, the Forest Service has set up a cabin system over much of Alaska. You can hike, bike, or fly into remote regions and stay in these cabins. They are very basic but in places you could not stay otherwise. The cabins I have been in have a wood stove, table, bunk beds, and benches in them. You "rent" the cabin by signing up on the web and paying your $65/night. You can barely see the roof of our cabin if you look closely.


We took a .25mile hike to this rocky beach. My son fell in the water, of course.


He's about to go in. I didn't get a picture of him falling into the water but it was pretty funny. We made him get naked on the beach and we wrung out his clothing. Thank goodness for microfleece. It dries quickly and keeps a person warm even if it's wet.


Oh, oh! Sewing! See that pink top? It's a Jalie.


Rock climbing boy.


Daughter #1 enjoying the chilly bay water.


Here's our cabin. It was quite a task hauling our gear up and down this ladder set of steps.


When we left the cabin we found this fantastic little beach that was swarming with starfish and clams. What is my son doing with his face?? Sigh.


Daughter #1 was in love with the starfish.


Me? I was in love with the clams.


We boiled and cleaned these puppies that night. We bagged and froze them for clam chowder. Well, not before we ate a few.

This was after clamming. My favorite part of this picture is that she fell asleep while playing with her toy. Her sister fell asleep the same way about an hour later. It was peaceful.


So, I wish I could say, "I'm'a gonna whip up some sewing tomorrow!" but I can't. I have to run 10 miles, unpack the boat and car, finish my handsewing on my collar, do 78 loads of laundry before packing the truck again. Monday, I'm leaving to go to Fairbanks for a week to see family. Ugh. Maybe a fast knit top is in order. Maybe I can sneak it in. My husband says I get ornery when I don't sew. Maybe I'll convince him it's better for him if I sew something.

Sunday, July 5, 2009

Whittier - Non-Sewing Photos Ahead

Nothing sewin' going on. Skip this post if you aren't interested in Alaska eye candy.

We went to Whittier on a whirlwind camping trip. The girls were with the grandparents so it was me, my husband, and the son. We were visited by several orcas. I think we kept running into the same pod of whales. There was this big male that had a crooked and bent dorsal fin. You can't really see it well in this photo.


Here are his lady friends. They are much smaller and have shorter dorsal fins. We think they were chasing the sea lions. There were several sea lions that were just acting crazy. They were leaping out of the water and staying close to the boat. Usually they don't like boats.


We dropped some shrimp pots and pulled up a small octopus. He's our dinner tonight. Yum. My son named him Kit. Tonight we'll be eating Kit.


Some of the shrimp we pulled up and a very small yelloweye caught by yours truly.


My son, the shrimp master.


We also pulled up a bizarre sea star. I've never seen one like this. The pots were in about 500 feet of water. I would guess this thing would be a square yard if he spread out all the way.


This the tunnel entrance to Whittier. See that mountain? We're going right under it. It's the longest tunnel in North America. It's only the width of a rail car so everyone comes out of Whittier and then, a half hour later, all the people go into Whittier. They have to suck out all the carbon monoxide and vent it to the top of the mountain otherwise it builds up to unsafe levels. Oh, and a train go through it a few times a day too. It carries the supplies into Whittier. They have a small gravel runway for bush planes but this tunnel is really the only way in or out.


In the tunnel . . .


My son looooves to fish. This night he captured a jellyfish in a bucket and some kelp.


Here's our boat. She's 26' long. And yes, she has a bathroom. Really, that's all I care about.


We leave tomorrow for a week long trip to Homer. We'll go clamming, fishing, camping, and visiting with all the kids.

Thursday, July 2, 2009

Simplicity 2922 Take Two

I think I got all the kinks out of the pattern. I wanted to do another test before cutting into my silk. The weight and drape is similar to this polyester (?) gauze. It was one of those donated fabrics so I wasn't worried if I destroyed it. It's not particularly fantastic. And the color is exactly the same as surgical scrubs. I only had enough to do the tunic length but I'm only worried about the shoulder area anyway so that's okay. The only thing different from the red dress is that I topstitched the yokes.


These pictures will get bigger if you click on them.


I can't ever hear when my new camera clicks. This time I was turning around as the self-timer was doing it's job. Whoops.


Look away pattern drafters. I don't know what I'm doing. This may look ugly to you but it worked. To remove the gathers in the back I made three slits in the tissue and overlapped it until the notches matched.


Here you can see the bodice and the bottom piece together.


This is really a simple pattern. I added the neck band to the top of the bodice piece for the red dress and didn't change that technique for this version. There are only four pieces for the whole tunic/dress: bodice front, bodice back, lower front, and lower back. Waaaaay easy and no fitting issues because it's a loose and easy pattern. I'll post a proper review later on Pattern Review. I plan to cut into the silk Monday or Tuesday. I have to run eight miles tomorrow morning and then we are going boating/fishing/camping. We'll be back late Sunday and we'll have to unpack. Kristine, this is your chance.

Wednesday, July 1, 2009

Simplicity 2922 Muslin

So, here again is the dress that I like. I decided on Simplicity 2922 as my base pattern. I made up a muslin today and I think it's coming along nicely.


I had already decided that the belt would go all the way around instead of the buttonhole belt holes. I may or may not add sleeve cuffs. I kind of like them how they are right now so I might now add the cuffs. I cut off about three inches off the top of the sleeve. I'll show all the alterations in a later post when I figure out everything. I'm usually an above the knee kind of gal but I like this length too. This is the first Big 4 pattern that I've ever worked on that really has potential. Maybe I'm just getting better at fitting my body and figuring out what works for me.


The original Simplicity pattern has quite a bit of gathering in the back under the yoke. I did that originally but then I took most of it out. I had to take a 1" tuck in the back yoke. But I realize now, they added seam allowances because they put a zipper in it. I should have taken out the seam allowances on the pattern pieces before cutting it out. Duh. I also took out most of the gathering. I may take out a little bit more. I know the Hot Patterns dress does have gathers but I like this better.


You can see how the the gathers puff out a bit.


It was my birthday yesterday. Not only does my husband buy fabric, he buys me shoes for my birthday. Eat your heart out ladies. He bought this pair and the red patent leather pair I've been coveting.

Couture Jacket Class -- 5

So, when I last left you, the wool was being thread traced. I finished all that on all the pieces. Then, I cut out the interfacing for all the pieces. This is a thinner, drapey wool so all the pieces are interfaced. After I cut out the interfacing, I had to quilt two pieces of interfacing together. This was done by machine. There are two pieces of interfacing on the upper back and upper shoulders. I basted my interfacing to the wool and re-thread-traced the seam allowances and roll line. After I attached my interfacing, I started pad stitching the lapel. I also added a woven tape to the roll line. It's not a twill tape even though it looks like it. And it's not a bias tape. This tape has a slight stretch and recovery to it. That's important. Twill tape does not stretch and bias tape stretches like crazy but doesn't recover. So, you put your woven tape on the roll line and keep it just shorter than you need. I pinned both ends, stretched it to fit, and found the middle. I used a fell stitch to attach the tape to the roll line.


Here's a close-up of the fell stitch. Threads just did a little online tutorial on it. Perfect timing Threads!


Then you get ready to prick your fingers. You roll the lapel like it will be when you are wearing it and start pad stitching. It's an easy stitch and it goes fast. I made 1/4" lines on my interfacing so they were straight.


See how nicely it rolls? The corner of the lapel has smaller, denser padstitching that is almost perpendicular to the other padstitching. This is so the corner really hugs the body.


Now, when I lay the lapel flat, the fabric bubbles. This is exactly what I want. The padstitching creates subtle shaping. The stitches do go all the way through the fabric but the thread is exactly the same color so you can't see it.