Showing posts with label tutorials. Show all posts

Saturday, June 3, 2017

Tutorial: Adding a Pocket to Your Loulouxe!

Remember how I said I’d write a tutorial? Well, here it is!!

j_3679_27


Find Pattern Piece C (Skirt Back) and make it a full-sized pattern piece. As it is, it’s an “on the fold” piece. Make sure and mark your center line because that will be important later.
j_3679_13


Find a piece of fabric that is larger than the pattern piece.
j_3679_14


I used a 12-14” invisible zipper. You could also use a regular ol’ zipper too. Figure out where you want the zipper. You probably want it somewhere toward the top but do not go so high that you get right next to the seam allowances.
j_3679_15 


Eyeball where you want the opening to be and make a nice, straight cut across the entire length of the fabric piece.
j_3679_16


This is where a ruler and rotary cutter are nice. Right now you are just eyeballing it. We’ll get precise later once the zipper is in.
j_3679_17


Install your zipper. Since I used an invisible zipper, I used my invisible zipper foot to install it.  I did not use any interfacing but this knit is pretty stretchy but also stable.
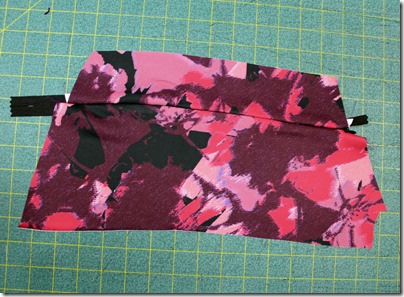
j_3679_18


Same thing but from the back.
j_3679_19


Here’s where we start getting precise. On your pattern piece, draw a perpendicular line where you want your zipper. Take your full pattern piece and put it on top of your pieced fabric.
j_3679_20


Now line up both edges of this horizontal line with your zipper. This ensures that your zipper opening will be straight across horizontally.
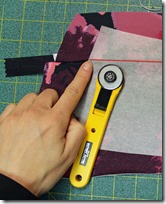
j_3679_21j_3679_22


Once you think everything is lined up, cut out your piece. Make you DO NOT CUT OFF YOUR ZIPPER TOP! You will probably need to unzip your fabric piece BEFORE you cut to avoid doing that.
j_3679_23


Cut out a second piece of fabric that will go behind your zippered piece. You can see here I basted my zipper opening closed. Otherwise, there is a the very real possibility that you will forget there is no zipper stop and pull your zipper head right off. Don’t do that, it’s annoying.
j_3679_24


Baste the two layers together and treat them as one piece for the remainder of the construction process. My serger dislikes going over plastic zipper tape, so I always also go over this seam with my sewing machine to make sure those stitches won’t come out. Also, if you are using a metal zipper you SHOULD NOT sew over it. You need to remove the zipper teeth.
j_3679_25


Here’s my skirt partially constructed. The only double layer is the one piece. Assemble the rest as stated in the directions! See? It’s EASY!!
j_3679_26

Tuesday, March 29, 2016

Jalie Guest Blogger

Guess who was a Jalie guest blogger today? Oh yea, ME! I used Jalie 3022 to make this really cute pair of shorts. Here’s a link to the actual post on the Jalie site. I actually have another pair of these all cut out and ready to go. This time, though, they are for swim shorts.


j_3022_3

Wednesday, September 30, 2015

How to Sew French Seams

This Challenge #3 of the FabricMart Challenge I’m in right now. Each participant was given a topic and we had to create a little tutorial for it. Here’s mine.


french_9

french_17
A French seam is just a fancy way of sewing a regular seam. Using this technique, you are enclosing the raw edge of the fabric so both sides of the garment look nice. This is a really great technique for light or sheer fabric where you may see the raw seam allowance edges through the fabric. It’s also great for things where you may see the inside of the garment, like an unfinished jacket or the join in a scarf. This also works with thicker fabrics, but the seam allowances may get bulky.
french_10
Put your fabric together WRONG sides together. Yes, really. I know normally you put things the other way. Trust me, this time put your fabric WRONG sides together. Instead of doing your typical 5/8” seam allowance, do a 3/8” seam allowance. When I’m making something with French seams, I like to do all the wrong-sides-together stitches first. For example, on a top, I’ll sew the shoulder seams and side seams all wrong sides together and then go on to the other steps. I find things move faster that way.
french_1


french_11
Iron your seam allowance open.
french_2


french_12
Trim your seam allowance to 1/8”
french_3

french_13
Now, fold the RIGHT sides together and press the seam with your iron.
french_4


french_14
Go back to the sewing machine and sew 1/4” from the seam edge. You are still getting a 5/8” seam allowance, you are just doing it in two steps!
french_5


french_15
Go to the wrong side and iron down that beautiful inside seam.
french_6


french_16
Enjoy your beautiful seams on the inside and the outside!
french_7french_8

And voila, you have a garment that is beautiful inside and out!!

Here's a link to the other contestants. And here's a link to vote!

Friday, April 17, 2015

How to Add Line Drawings to Your Pictures

I’ve gotten a ton of questions lately about how I get the line drawings into my pictures. I have to give all the credit to Melissa of Fehr Trade for what she said in one of the posts at PatternReview. Then I had a head-slapping moment and I’ve done it ever since! So here’s your little tutorial. It’s not hard, but easier to explain with pictures.
tut_1


Go to the Burda Archives or the BurdaStyle and find your line drawing. This might actually be the hardest part because Burda isn’t known for keeping things easy to find. I use Burda’s French website, but they haven’t been updating the magazines for 2015 (but they do go all the way back to 2006!!). Find your line drawing, right click (on a PC, I have no idea what you do on a Mac) and select Copy Image. ETA: You can also get line drawings from Simplicity, McCalls, etc. The only difference is that you will need to crop out the other versions of the pattern first. Well, unless you want all the different versions on your picture. I do this sometimes with Burda too. They will show the front and back, and I only what the front or something like that. 
tut_2


I’m using Adobe Photoshop Elements, but any program with layers will work. Make a new page. Click CTRL V to paste your precious line art into the new window. You can also just clock from Image from Clipboard. Both ways work well. 
tut_3


Use the Quick Selection Tool to select all the empty space around your line drawing. Notice how the dotted lines go around the outside of your line drawing to the borders. You’ve selected all the white space around the line drawing. This is where I used to delete the white space, try to crop the photo, make the background transparent and try to use the crappy line drawing. Trust me, this next step makes this worthwhile.
tut_4


Here’s the head slapping moment (for me anyway). Type SHIFT + CTRL + I to select the inverse (so now you are selecting your line drawing (duh!). Then, while your line drawing is selected (the dotted line will be around your line drawing now and NOT the outside edge), just type CTRL C to copy. Then go to your lovely photo and type CTRL V to paste it in.
tut_5


You can change the size of the line drawing, position it where you want it, etc. In my program, it pops up automatically as its own layer. If yours doesn’t, just make a layer and paste it in on that blank layer. I should add that I’ve already corrected this photo and changed the size to the final size. You don’t have to, but photos are usually large and line drawings are small. You’ll end up with a micro-line –drawing and you’ll end up enlarging it so much it starts looking bad and distorted.
tut_6


Hope that helps you guys!! Obviously I chose a random line drawing and a random picture to go with it. Ha!

Tuesday, August 21, 2012

Cute Skirts!

Look folks! Sewing! On a sewing blog!!

I made these little twirly skirts for my girls. Are they not cute? This first one is made out of shirting material. The background is a cream and the stripes are hot pink and gray. I used the directions from Dana to make these. She has a ton of awesome tutorials. made_skirt_5


I added a little fun bling to this skirt.
made_skirt_1


I used my serger so all the inside seams are pretty. I used variegated thread for extra special fun.
made_skirt_2


I added my label to the back so everyone knows where the back is. On these skirts, it won’t really matter since they are the same front and back.
made_skirt_3


I used my serger to make an east rolled hem.
made_skirt_4


This one is made out of slightly thicker pique material. I’ve had this fabric is my stash for a few years now. 
made_skirt_7


I did the same rolled hem but used a spring green thread for contrast.
made_skirt_6


This is actually the first skirt I made. The ruffled layers are an ITY knit from Fabric.com. It turned out pretty fun.
made_skirt_10


Because it was an ITY, I didn’t hem it.
made_skirt_8


The inner sections are a hot pick like the top. This skirt is more droopy when the girls are wearing it but it also has a lot more movement and actually twirls really well. 
made_skirt_9 

The shirting material is the perfect weight for this project. I’ll be making a lot of these. The knit is a little too floppy and the pique is just a little too thick. A duppioni silk would be great; lots of body but not too thick. I’m pretty sure I’m not going to spring for silk for six year-olds.

Sunday, March 11, 2012

Infinity Scarf–Tutorial

This is not a hard project at all. From cutting to hand sewing my opening shut, it took less than an hour. I used one of the sweater knits from Fabric.com that came in the mail a few weeks ago. It’s very cute fabric. It’s very sheer so it would have been hard to use as a top. I took pictures along the way in case anyone wants to make their own.

infin_14


The 72” is negotiable. I happened to have exactly two yards so it was 72” but you could do it with less fabric. I can fold my scarf three times around my head at this length. You could definitely go smaller and only do two wraps around the noggin.
infin_2


Obviously, I had too much fun while writing this.
infin_3


The scarves I saw at Nordstroms all had a twist like this.
infin_4

infin_5

infin_6


Does this opening remind you off these creepy little kids toys? I mean, what the shit. They creep me out and I’m an adult. No, really, watch the weird little promo video.
infin_7


Boy, I look angry in these photos. It’s only because the sun has come out and us Alas-kans can’t handle bright light. We are like moles. Remind me not to wear that shirt in bright sunlight with a black bra. I’m not really selling this scarf with my angry, frowny eyes and pasty skin but it’s really cute!
infin_8infin_9


Here are a few close-ups. I love the fabric.

infin_10infin_12infin_11infin_13