Thursday, August 6, 2009

Crow Pass

Here we are at the beginning. I'm on the right and my college roommate, K, is in the middle. The girl on the left, M, went to high school with K and we met on my first day of college too. We've done a lot together and have very fond memories of our last 15 years together. K is a nurse in the Air Force and lives in California but M lives in Anchorage with me. M also has a set of twins and a five year old.


We found huge salmon berries on the first mile of the trail.


Here's the actual Crow Pass. It was really, really windy up here. We've climbed about 2000 feet at this point.


K and I with the Raven Glacier behind us.


There are several of these photos because we used to do this in college all the time. On this trip, we did it at strategic points. This is in front of the glacier.


K has no kids but M and I both have three. We are all very excited to be together again and to be without kids. Can you tell?


We started at the bottom of this valley down where the two mountains meet.


We camped next to a gorge. It was noisy but soothing. We only made it four miles in the first night because M didn't get off work until 4pm. After this point, it's a very long haul to a place where you can set up a camp. And yes, we only went four miles the first day. That means I went 22 miles the second day. Yea. Twenty-two miles. Ouch.


Requisite tent photo. K used to have horrible vision but got Lasik surgery courtesy of the Air Force. Now, she rubs it in.


K had a way of flushing out the wildlife. This was the first moose we saw. I had a chance to take a photo. The second one was close enough I could have tossed a stone underhand and hit it. He was not happy we were so close so we moved fast. He was lowering his ears at us which is a big warning sign. I did end up packing the gun and I'm glad I did. At one point K was in front and was less than 10 feet from a grizzly bear that was standing on its hind legs. She couldn't see it because she was too close to the bushes. The bear was right behind the bushes and stood up over her basically. I saw it because she was about 10 feet in front of me. I yelled and pulled my gun. She said she wasn't scared until she looked back and saw I had the gun out. Then she knew something bad was about to happen. She ran back and stood behind me. She never did see the thing because once it figured out we were humans, it took off. Of course, the next section of trail was grass and alders over our heads and dense. We couldn't see the ground and we had to crawl under some of the trees. I kept the gun out during that part because there was bear sign everywhere and it was perfect bear habitat. That was right before the river crossing.


This is the river crossing we had to do. The river was a brisk 32 degrees because it comes from the glacier. We disrobed on the beach and put on shorts. It was buttock deep and faaaaaast moving. It's a good thing we've all done things like this before.


You actually had to cross several channels. So, you froze your legs off, got on land, marched back to the water, got on land, and marched back into the water. They have put up white poles to show people where to cross.


Our legs were red when we got out. These two are wincing and dancing around.


There were several rope/log bridges to cross too. Because the water level is so high right now, many of the smaller bridges were under water too. We forged those creeks too.


This is the end. We all had blisters from wet feet but we are happy and exhausted.


My other college roommate, J, picked us up and gave us wine. She didn't have a corkscrew because someone had borrowed it so she was using a drill. Strangely enough, J also has twins. M, J, and I all had twins within nine months of each other. If we go somewhere together it's three moms and eight kids. My son, who is five is the oldest. So, eight kids five and under. Yikes.


I'm off to get some sleep. Whew.

Monday, August 3, 2009

Wish me luck.

I just have to get in one more grueling hike before school starts in 10 days. It's 26 miles and there's river crossing which could be scary. Hopefully it won't be bad this time of year. We will be doing it in two days so I'll be pooped when I get back. I'll take lots of pictures and hopefully none of them will be bear photos. I've decided not to carry a gun because (1) it's heavy, (2) there are three of us, and (3) it's not easy to holster a sidearm when you have a full pack. It's likely we will run into one (or two or three) because it's berry season. Hmmmm, now I'm talking myself into carrying one again. I'll sleep on it and we'll see how I feel about it in the morning. I'll be offline for a few days so I'll answer any emails when I get back to walking normally again. :)


You can click to make this larger. It's from 55 Ways to the Wilderness in Southcentral Alaska.

Sunday, August 2, 2009

Burda 08-2009 #113 Knit Dress

It's a pretty little dress. It's very casual but I could see wearing it to work. This is Burda 08-2009 #113. It should have been pretty easy but I couldn't figure out Burda's directions for the front/side/back facing bit. In the end, I left off the facing. More on that below. I don't like how I get that little muffin top effect over the waist. I did cinch up about 2" of additional fabric into the neckline to get rid of the muffin top. It almost worked.


Here it is with no belt. I think I like it with the belt better.


I told you that I left off the facings. Instead I folded over all the edges and either zigzagged them or hand stitched them down. I wound some thread up in my other sewing machine so I'm using the Necchi and I really like it. The bodice front is lined with swimsuit knit. The gathered section is pulled up and over and catch stitched to the lining. The arms, back, and hem were simply folded under and zigzagged. My Necchi does the best zigzag in the world. To support the neckline, I first zigzagged on a piece of clear elastic. Then, I folded the edges over and zig zagged again. On the gathered section, I zigzagged on the elastic and then hand sewed it down. I meant to take pictures of that part but them forgot.


If the muffin top really annoys me, I will take it apart at the waist and take out fabric from the bottom of the bodice. Part of the problem is that this fabric is heavy and stretchy so the bottom of the bodice pulls down the top.

Hmmmmm . . . 7594

This is one of the new envelope patterns from Burda. It's 7594. I think I would get a lot of use out of it in a sweater knit this fall/winter. Is it from a past Burda WOF? I would rather search down and buy the magazine than a single pattern. Of course, I could probably just morph together this pattern from existing patterns I already have. It's just a turtleneck on a looser drop-shouldered knit top. Do you think the sleeves are just folded up and tacked? Or, do you think they are doubled and sewn on as a cuff?


I should be able to show you the crushed velvet dress today. I'm just trying to figure out the neckline and how to finish it.

Friday, July 31, 2009

Crushed Velvet Dress

This is Burda 08-2009 #113. I love the fabric they used on this dress. I have some poly/lycra stretch velour and decided to try my hand at crushing it myself. The design is pretty simple. I didn't want to just use plain velour because I thought it would be too boring.


I took a scrap of purple velour and roughly pleated it with my fingers. I turned the iron to Linen, it's hottest setting, and pressed the pleats. I was a little worried about meltage but it was fine. I got this idea from a Threads video I watched a quite a while ago about crushing silk/rayon velvet. This purple velour has been crushed several times. Then I washed it and dried it. I figured if I went to all this trouble to crush it, I didn't want it coming out in the wash.


I don't have enough of the purple so I'll be using this printed velour below. I think the print and texture will work well for this dress.


I'm going to go trace it out. It's one of the rare patterns that comes in a size 34 so I don't have to grade it down. Yay!

Couture Jacket Class -- 7

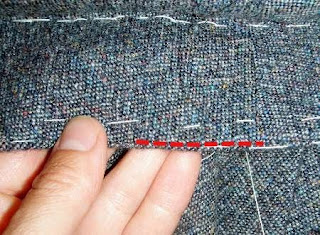
In my last jacket post I showed you the collar and all the padstitching. I forgot to add this picture. This is from the undercollar side and it shows the turn of cloth. I has always read about it and it made sense but I never got anything that was a great example. This collar is a good example of that. The upper collar is a bit longer and wider which causes it to slightly turn to the underside.


from Threads magazine (here's the whole article):

Why does it matter?
On a beautifully sewn collar and lapel, the enclosed edges turn neatly under to the wrong side, and the seam is not visible from the "public side" (the side that shows when the garment is worn). If the turn-of-cloth isn't taken into consideration, the upper collar and lapel area of the front facing "steal" some fabric from the under collar and lapel, causing the seams to curl back to the public side.


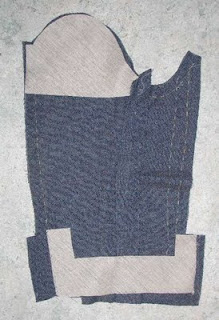
After the collar I attacked the arms. These are two piece sleeves with bias-cut canvas in the sleeve cap and sleeve hem. This sleeve has a rounded sleeve vent.


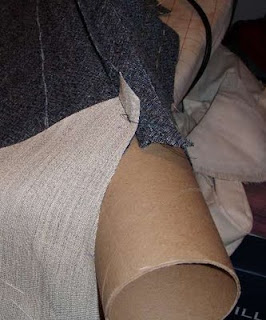
Here's my free sleeve form. I use a giant cardboard tube. It's comes from the bulletin paper rolls at school. They are stout so I can press on them many times before I need a new one.


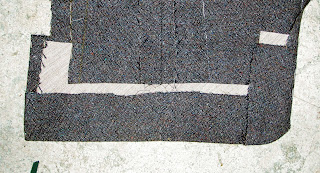
The sleeve vents were very fiddly and took me a whole day to put together. When I say "whole day" I mean a whole day with kids "helping". I probably could have gotten it done in a few hours if I was alone. It's a lot of hand sewing and it's all pretty small.


Here's the finished vent from the outside. It's weird because there is a raw edge on the inside. I'm sure that isn't how it's supposed to be but it's there and the lining won't cover it because it goes all the way to the hem. I read the directions repeatedly and I think it's the way it's supposed to be although it doesn't seem right.


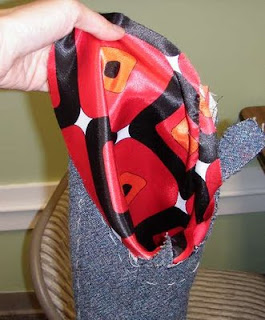
Next, I lined the sleeves. You line the sleeves before you set them on a couture jacket. To attach the lining to the sleeve, turn both of them inside out and loosely sew the seam allowances of the lining to the jacket. Turn them both right side in and voila . . .


. . . lined sleeve.


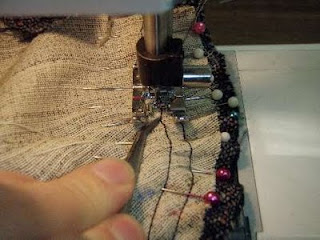
For the sleeves, I machine basted, pin basted (see Ann's tutorial about this), and hand sewed them in. Once it was okay, I machine basted them. Then, I permanently sewed them in.


Don't sew over pins. I did but it was nerve-wracking. I use the tip of my tweezers to push down unruly parts of the sleeve.


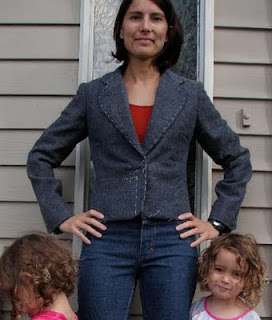
Here it is from the front. I have it pinned shut and it's not exactly lined up correctly. There are no shoulder pads in here and I'm debating not putting any in at all (shush! Don't tell Linda!). It fits better without them but I am worried about the chest caving a bit because I am pretty hollow between the shoulder and bust. This jacket has a layer of horsehair canvas in the entire thing plus it has a quilted shoulder region. So there are two layers of horsehair in the shoulder area. What do you think? Do I do the shoulder pad thing anyway? It makes the armhole (armscye?) really tight.


The back doesn't fit as well as I would like. There is a bit of a bubble between the shoulder blades. I'm not sure how to get rid of it but maybe a good pressing will do it? Then the mighty swayback is also there although not bad. At this point, I don't think there is anything I can do about them. I don't mind cutting my catchstitches and re-sewing but I don't think that is what needs to happen.


You can see the top bubble when I pull my arms forward. It's almost like there is too much fabric vertically. We added an inch to the back so it might be that there is too much fabric there. I really struggled putting the sleeves. I took out and put in the right sleeve about six times. After that I was worried about the fashion fabric so, even though it's not perfect, I think I'm going to have to let it go or risk destroying the fabric.


I still think it looks okay especially from the front. I do think I forgot about fit and focused on the details too much.


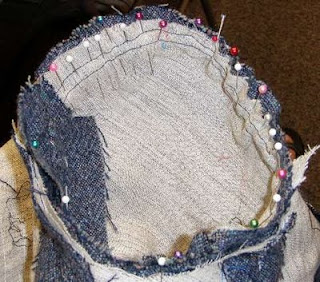
I still have to figure out the shoulder pad thing, put in the main lining, add buttons, and do some handstitching.